Total Pageviews

From December 2008 through December 2011- our group of ladies have sent 6,117 cards to the troops.

IF YOU WANT TO VIEW A PICTURE JUST CLICK ON IT AND IT WILL ENLARGE.

Monday, April 30, 2012

another card for friends


inside of card: "when you plant the seed of friendship nurture it with card and good humor, in time it will grow into something beautiful."

Sunday, April 29, 2012

a card for a friend

 colored with copic sketch markers.

inside of card: "nobody does the girlfriend thing "the just dropping by, on my mind, calling for no reason, got this just because, how about coffee, let's walk, gotta talk, tell me about it" thing quite like you. "

Saturday, April 28, 2012


inside of car:  "if you're alone, I'll be your shadow.  If you want to cry, I'll be your should. If you want a hug, I'll be your pillow, If you need to be happy, I'll be your smile, but anytime you need a friend I'll just be me."

an easel card

and easel card.

Saturday, April 21, 2012

creating with AC duct tape

Look what you can do with this.  I created a little embossed flower to put on a card.  I used my cricut (small) machine to cut out the flower then I cut a square of card stock and glued the flower to it.  then I cover it with the AC duct tape. then I rubbed the tape and the embossing starting happening.   Then I used acyclic brown and yellow and spread the paint over the square let it set for a little bit then rubbed some of it off, and this is what I was left with.

I was inspired to do this from the make an take I did at the local scrapbook store the night before.


Fleur de lis make and take

last night (04/20/12) went to the local scrapbook store (scrappin friendzee) with a friend.  Enjoy the visit with all the ladies there.  To my surprise the owner, Jackie had a make an take for us to do.  This fleur de lis was made using the AC duct tape, die cut fleur de lis and embossing plate, then we rubbed different shades of alcohol inks and put on a little flower embellishment isn't that so cute.

Friday, April 13, 2012

cupcake tray- Copic coloring

Love this image

Thursday, April 12, 2012

bunny Easter baskets

 Easter baskets I made for my 2 grandbabies all from cardstock and pattern paper.


Wednesday, April 11, 2012

sunflower- copic coloring

copic markers that were used: E19, Y14, Y06, YR12, YG67, YG17.

Tuesday, April 10, 2012

Monday, April 9, 2012

owl- copic coloring

I just love this little guy.

Colors: YR23, Y17, 23, E25, E57, E35, E19, E15, Y38, YR18

Sunday, April 8, 2012

little boy in dad's suit-copic coloring

Add E57
 Add E25 color in the whole suit, pants, and shoes, and color and blend the E57
 Add N5 on the soles of the shoes
 Add B45 on the hat and the ties.

 Add B21 and blend with the darker B45
 Add BOO
 highlight the skin with E11
Add E00 over all the skin area and blend in the E11
now with the blender marker in circular motion color over the whole suit lightly.
 Add E33 on the dog for highlights
 fill in with E31 also going over the area you apply E33 to.
 add C8 on the hair, and then take BG10 and color around the dog and the boy
take a brown ink and highlight the shape

Saturday, April 7, 2012

Magnolia Flower - copic coloring

 Add E15
Add Y23
Add E00
 Add BV0000
 Add BV31
 Add YG99
Add YG95

Wednesday, April 4, 2012

Sunflowers- Copic coloring

 Using E57 and YR14 color in the center of the flower.
Add YR18
Add YR04 and color over the area that you color YR18 blending the two colors.  You may have to darken the YR18 area.
Add Y19 color over the areas that you color YR04 and YR18 to blend all colors
Add B14
Add B12

Tuesday, April 3, 2012

Gate with flower - Copic coloring

Thought I would share with everyone on how I colored this gate with flowers using Copic Markers.  I am a beginner and I am sure there is lots for me to learn. But wanted to share just the same.

Add RV19 - I dotted each little flower leaving some white space.
 Add RV06 color the whole flower with this color going over the RV19.

Add G24 - to the leaves again just dotted to the leaves leaving white space.


 Using YG03 color in some grass - color just enough to there should be white area  in the grass.  Then use G24 and do short strokes as if you are making blades of grass (there is a picture missing but you will see the effect below).  Then use 0- blender to blend in the grass.


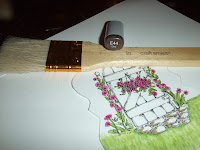
Ad E44 on the stones


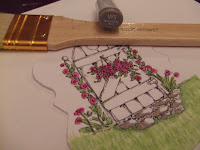
add W5 to the stones but do not go over the E44 area in the stones.
Add W3 and color over both the E44 and W5 on the stones.  Add W5 to the gate.
Add BG10 to the fence coloring over the W5 area and extending the BG10 into the white area, leave lots of white uncolored on the fence.
Add E13 around the edges of the stone to form a path.
Add B34 all around the fence and flowers and the one side of the circle on the upper part of the gate.
Add B32 to form the rest of the sky coloring over the B34 area.  You will have to use the B34 again to darker some of the areas.
Then use a 0 blender and color over the B32 and B34 area to soften the sky area.


finished image.  Hope you enjoyed.